Riana Documentation
Install Joomla Quickstart Package 3
We always recommend installing a Quickstrat Pack first to trial and understand the template more effectively. It must be installed as new, and not over an existing Joomla install. The installation version we provide in Riana for all our clients is accomplished and swift, the Quickstart, identical to the one presented in our demo page template. The procedure is simple and easy like a normal installation of Joomla! 3, containing all the extensions used in the template, their corresponding settings, contents, positions of modules and menus. There are two alternative ways of uploading and extracting Quickstart package:
In this article we explain to you how you can perform the default Quickstart by the following steps.
Get the Quickstart files
First of all you have to get the files from Themeforest download area and save it in your computer. Now you have to extract the file identified as Quickstart locally. After it is done, all files,necessary to perform this type of installation, are included.
Export of files by Cpanel
Your next step is to export all the files into the directory of your website where you want to install your new Joomla! template through your FTP software. The duration of the export depends on the uploading speed of your connection or your server configuration.
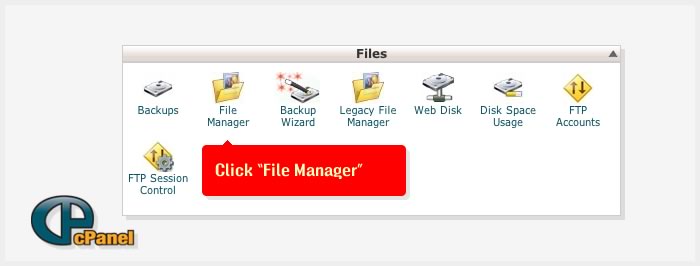
Then you choose the option "Upload" from the top menu and select downloaded .zip file from your local hard disk. If everything goes right you should see a small uploading progress bar on the right bottom of your browser.
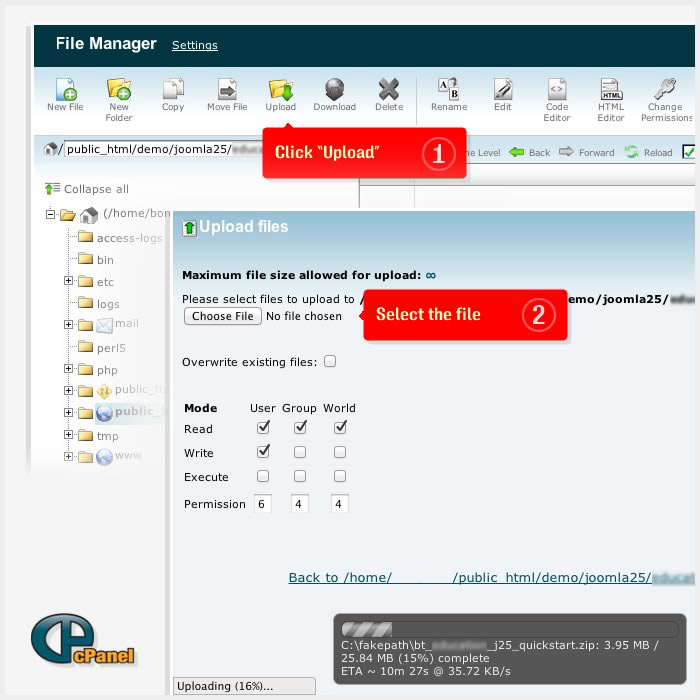
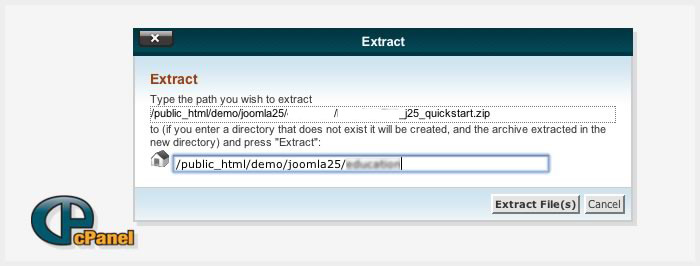
After you have completed the uploaded process you need to go back to file list view, select the uploaded package and choose the option "Extract" from the top menu. Cpanel application should ask about the place you want to extract your files. You can use root of your server or subdirectory.
Preparing your database
Now you need to create a new database to be used in the installation of your new Joomla! website. Therefore, access the control panel provided by your host and create a new database.
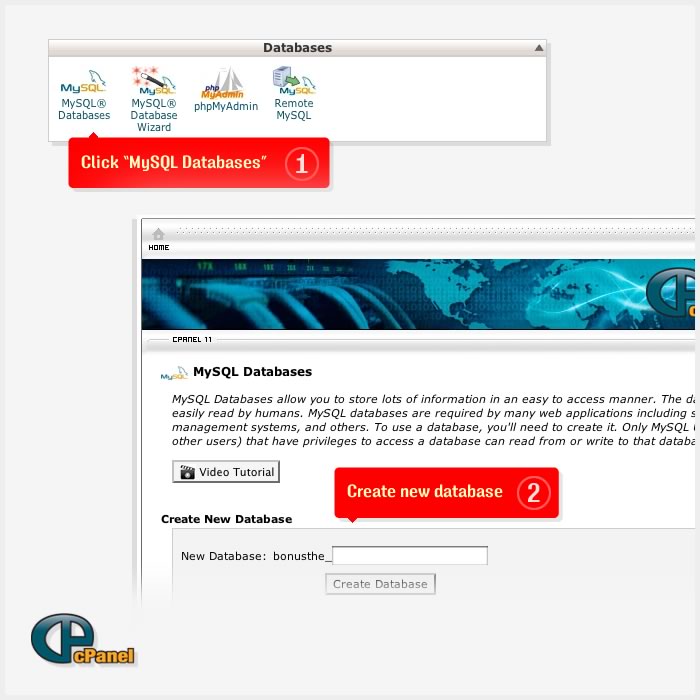
Then make a user account assigned to the new database with full permissions control over this. So it is time to start Quickstart installation.
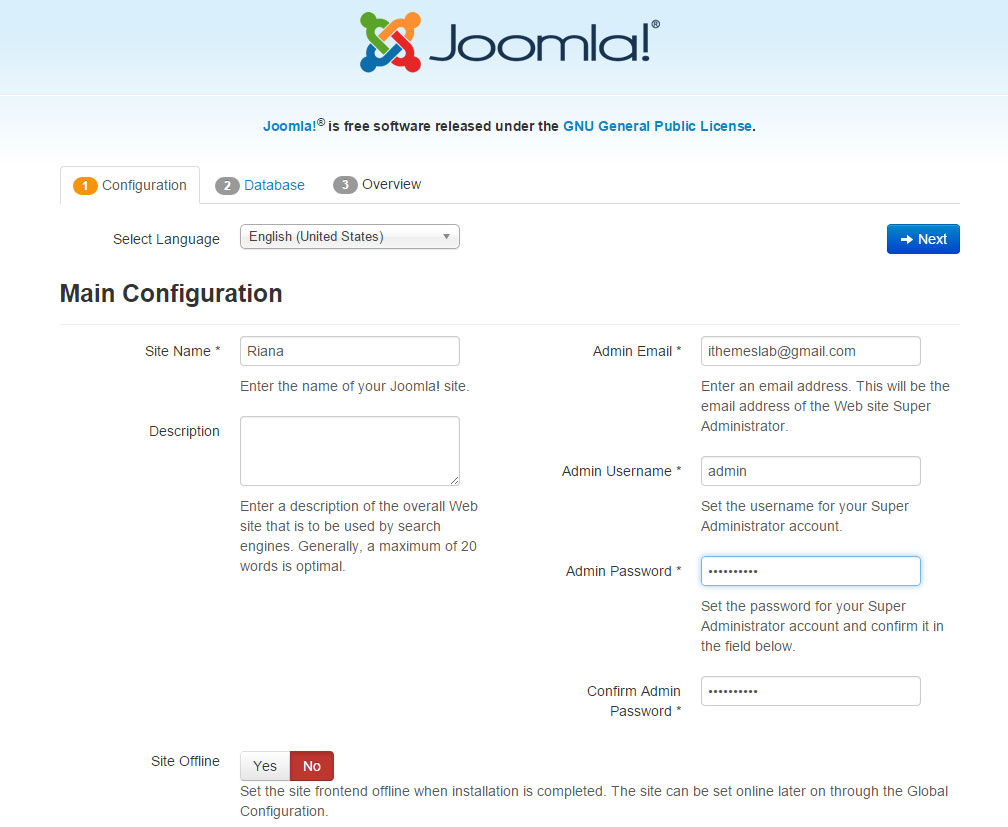
Start Installation (You can see the explanation of the below field from here)
Open your browser at the directory you are going to perform the installation.
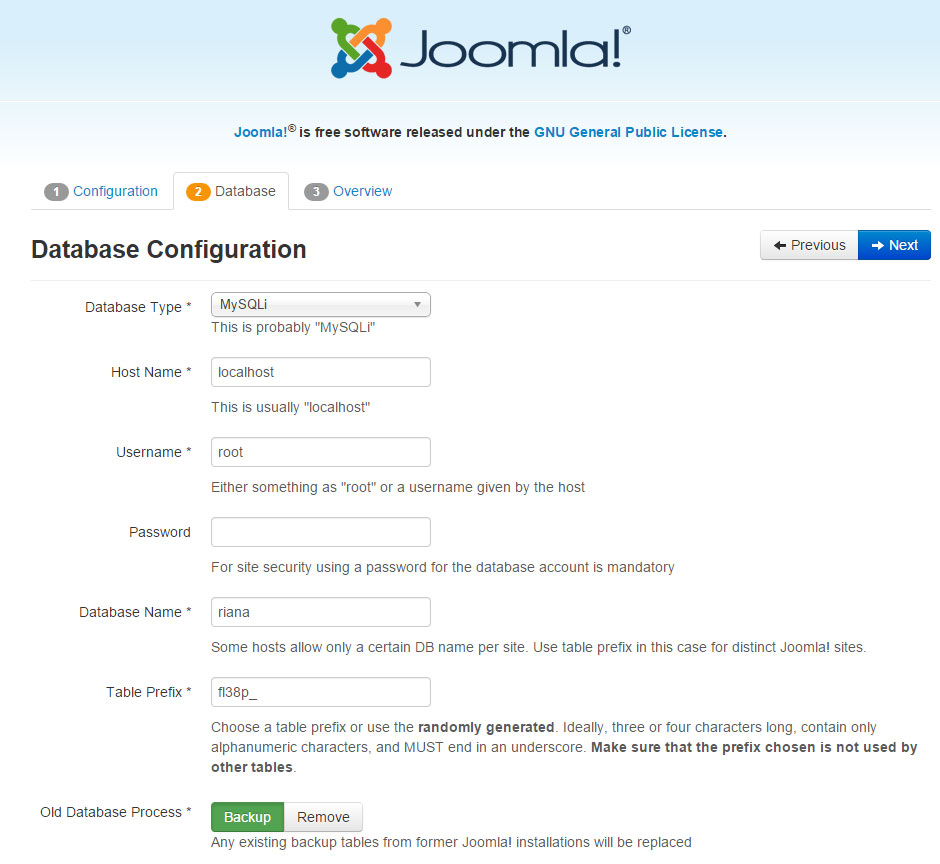
Database Configuration
You will need to enter the information about the database you will use for Joomla! now. It was suggested to write this information down under "Prepare for Install" tab. You may also read or review Creating a Database for Joomla!.
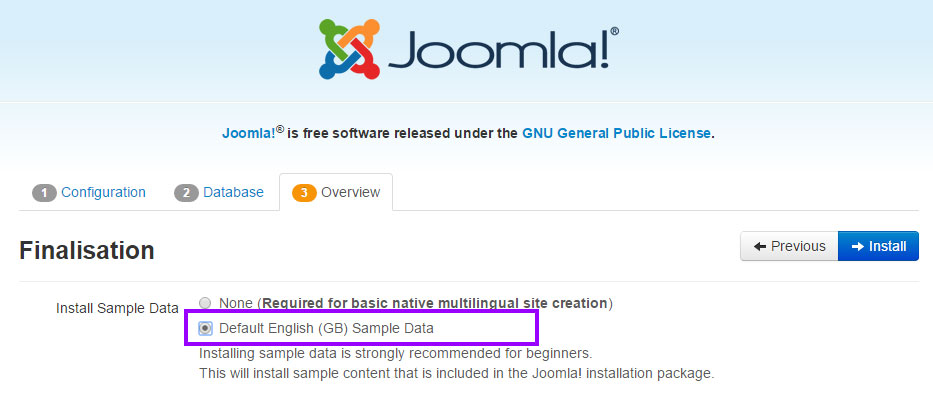
Finalise and Install with Sample Data
It is now time to finalise the Joomla! installation. The last page of the web brower installation contains all the information about the installation. This includes the options(at the top) for installing sample data and the installation's configurations(at the bottom).
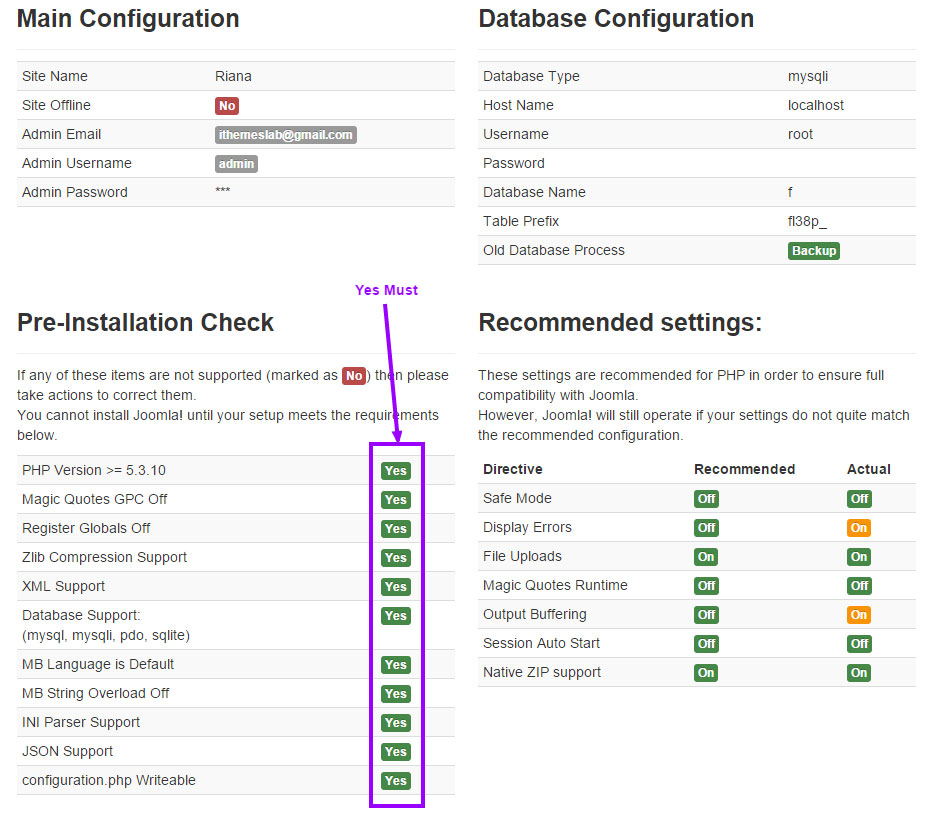
Checking Your Configurations
If everything is in order, you will see the install at the top of the overview page. If not, this is the place to check and see what may be causing an issue.
Success and Finishing Up the Installation
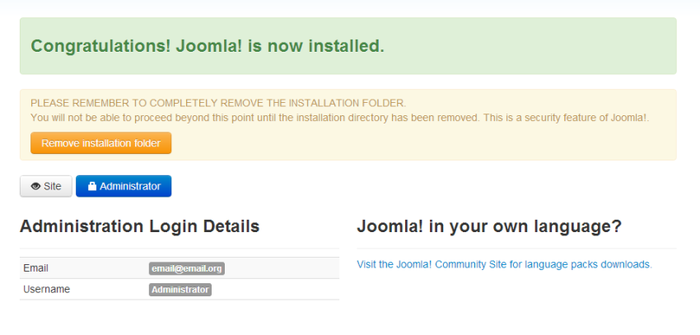
Well done! You have succeeded and completing the installation. But you must now remove or rename the installation folder.
After this step, click "Site" button to visit the homepage of your new website.
Home Page - Module Positions

Layout Configuration and Template Manager
Before starting with Riana please take a look with the power of T3V3 framework and its Layout Configuration.
- Backend Overview
- Layout Overview
- Mega Menu
- Adding Animation Effect for Megamenu
- How to install Google Analytics
Header-Top-1
In this module position we put social icons using custom html module with module class suffix social-icon as you can see the screenshot. We get the icons from FonAwesome.
![]()
You can get all the fontawesome icon name from here... and also the html code of this module is just below
<ul>
<li><a title="RSS" href="#" target="_blank"><span class="fa fa-rss"> </span></a></li>
<li><a title="Facebook" href="http://www.facebook.com/" target="_blank"><span class="fa fa-facebook"> </span></a></li>
<li><a title="Twitter" href="http://www.twitter.com/" target="_blank"><span class="fa fa-twitter"> </span></a></li>
<li><a title="Google plus" href="https://plus.google.com/" target="_blank"><span class="fa fa-google-plus"> </span></a></li>
<li><a title="YouTube" href="http://www.youtube.com/" target="_blank"><span class="fa fa-youtube"> </span></a></li>
<li><a title="Linkedin" href="http://www.linkedin.com/" target="_blank"><span class="fa fa-linkedin"> </span></a></li>
<li><a title="Flickr" href="http://www.flickr.com/" target="_blank"><span class="fa fa-flickr"> </span></a></li>
<li><a title="Skype" href="skype:#?call" target="_blank"><span class="fa fa-skype"> </span></a></li>
<li><a title="Vimeo" href="http://www.vimeo.com/" target="_blank"><span class="fa fa-vimeo-square"> </span></a></li>
</ul>
Header-Top-2
In this module position we put contact info using custom html module with module as you can see the screenshot.

Here is the html code of this module is below
<div class="top-email pull-right"><a href="mailto:support@charity.com"><span class="fa fa-envelope-o"> </span> support@charity.com</a></div>
<div class="top-phone pull-right"><span class="fa fa-phone"> </span> +366 123 444 876</div>
Slideshow
Home page slideshow comes with Revolution Slider 2. Please, see this video tutorial to understand revolution slider.
Revolution Slider Video Tutorals
You can also check detail documentation about Revolution Slider:
Revolution Slider Documentation
Feature Header

Title Part comes with custom html module and published on position name feature-header. You have to add module class suffix mode-header center-align from advance tab of this module.
Feature
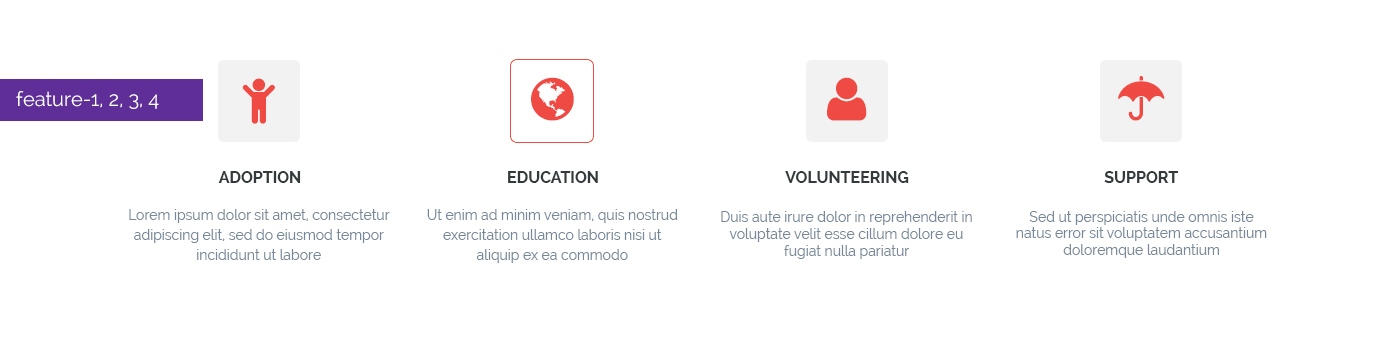
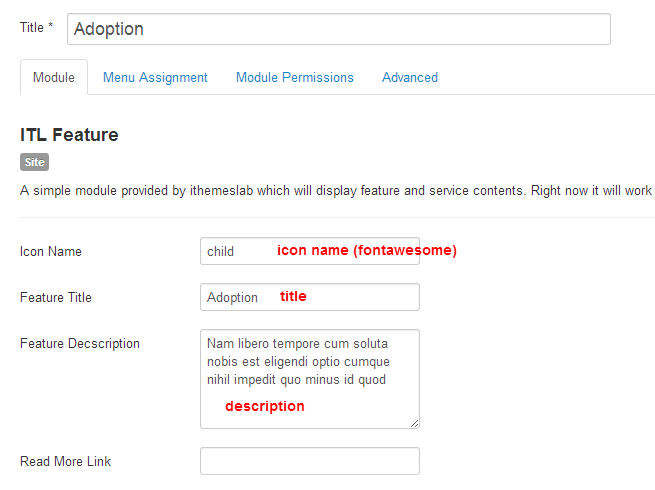
Title part comes with ITL Feature module along with font awesome and published on position name feature-1, feature-2, feature-3, feature-4. Just type the icon name (exclude: fa fa-), Title and Description. If you leave read more link blank then (read more) button will not visible on front-end.
Here is the screenshot of ITL Feature module's back-end screenshot.
Current Cause
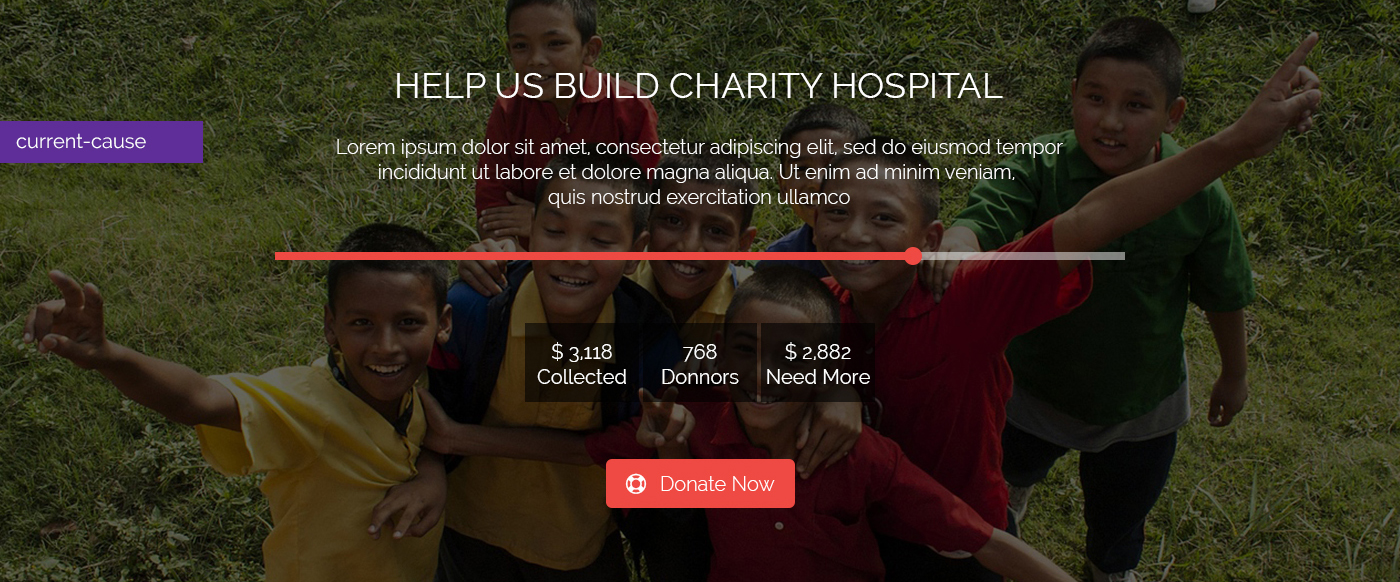
Title part comes with custom html module and published on position name current-cause.
Please, find the html code below
<h2>Help Us Build Charity Hospital</h2>
<p class="c2atext">Lorem ipsum dolor sit amet consectetur adipisicing elit sed do eiusmod tempor incididunt ut labore et dolore magna aliqua ut enim ad minim veniam quis nostrud exercitation ullamco laboris</p>
<div class="progress">
<div class="progress-bar" style="width: 75%;"><span class="sr-only">60% Complete</span></div>
</div>
<div class="stats"><h4>$ 3,118</h4>Collected</div>
<div class="stats"><h4>$ 768</h4>Donnors</div>
<div class="stats"><h4>$ 2,882</h4>Need More</div>
<p><a class="btn btn-donate" href="#"><span class="fa fa-support"> </span> Donate Now</a></p>
Change Current Cause Background Image
Go to root > templates > itl_riana > tpls > blocks > mainbody-home-1.php .
Open mainbody-home-1.php in an editor. On line number 27 you will find this codestyle="background-image: url('images/itl_demo/parallax/parallax-1.jpg');". Just change the image path of your own.
Urgent Causes Header

Title Part comes with custom html module and published on position name urgent-causes-header. You have to add module class suffix mod-header center-align from advance tab of this module.
Urgent Causes
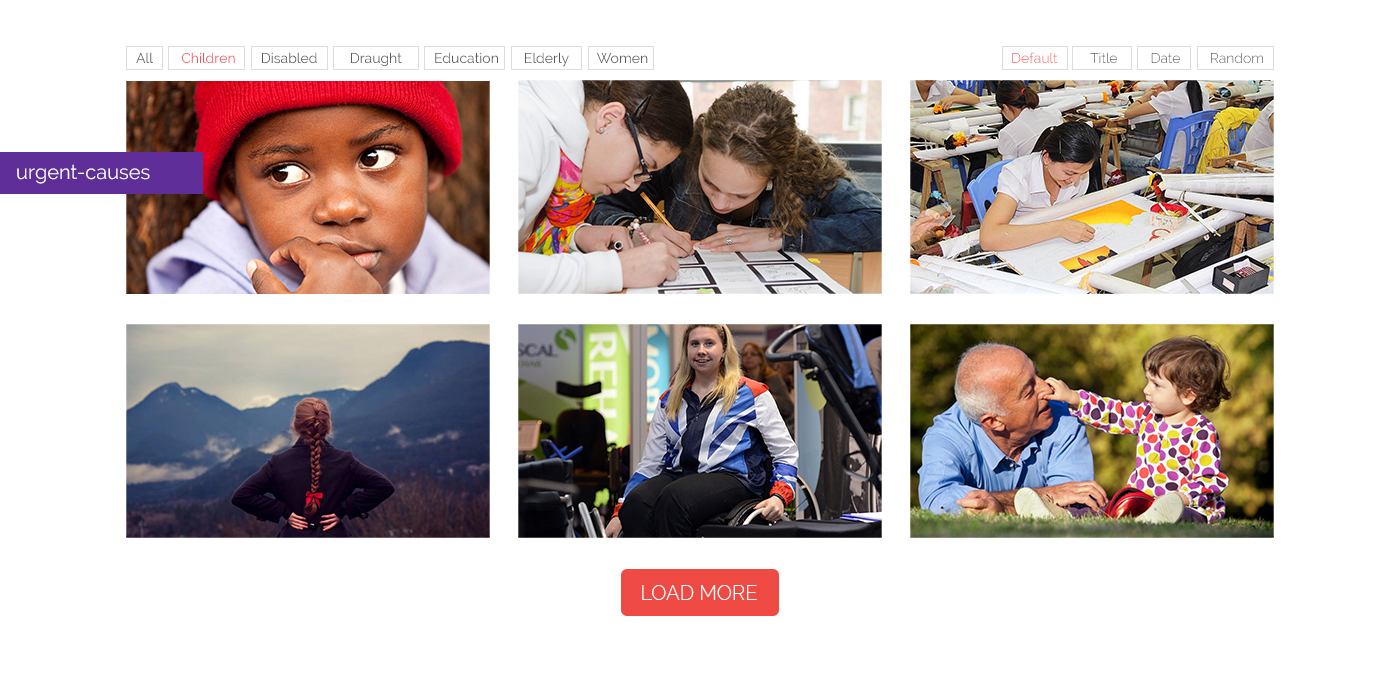
This parts comes by great Roksprocket module's Strips layout with Joomla article. At first create some article with category Urgent Causes. Put images on articl's intro image box from Images and links tab.
See the below configuration of Roksprocket module style Strips.

About Us
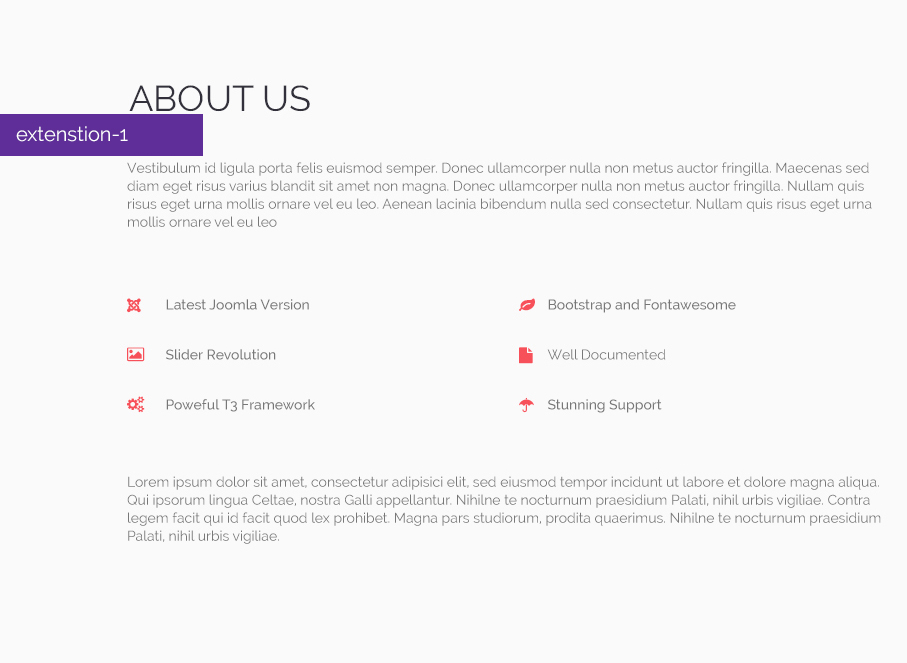
Title part comes with custom html module and published on position name extension-1.
Please, find the html code below
<p>Vestibulum id ligula porta felis euismod semper. Donec ullamcorper nulla non metus auctor fringilla. Maecenas sed diam eget risus varius blandit sit amet non magna. Donec ullamcorper nulla non metus auctor fringilla. Nullam quis risus eget urna mollis ornare vel eu leo. Aenean lacinia bibendum nulla sed consectetur. Nullam quis risus eget urna mollis ornare vel eu leo.</p>
<div class="row">
  <div class="col-md-6">
    <div class="icon-list">
      <ul class="fa-ul">
        <li><i class="fa-li fa fa-joomla"> </i> Latest Joomla Version</li>
        <li><i class="fa-li fa fa-image"> </i> Slider Revolution</li>
        <li><i class="fa-li fa fa-gears"> </i> Poweful T3 Framework</li>
      </ul>
    </div>
  </div> <!--/.col-md-6-->
  <div class="col-md-6">
    <div class="icon-list">
      <ul class="fa-ul">
        <li><i class="fa-li fa fa-leaf"> </i> Bootstrap and Fontawesome</li>
        <li><i class="fa-li fa fa-file"> </i> Well Documented</li>
        <li><i class="fa-li fa fa-umbrella"> </i> Stunning Support</li>
      </ul>
    </div>
  </div> <!--/.col-md-6-->
</div> <!--/.row-->
<p>Lorem ipsum dolor sit amet, consectetur adipisici elit, sed eiusmod tempor incidunt ut labore et dolore magna aliqua. Qui ipsorum lingua Celtae, nostra Galli appellantur. Nihilne te nocturnum praesidium Palati, nihil urbis vigiliae. Contra legem facit qui id facit quod lex prohibet. Magna pars studiorum, prodita quaerimus. Nihilne te nocturnum praesidium Palati, nihil urbis vigiliae.</p>
Volunteer Needed
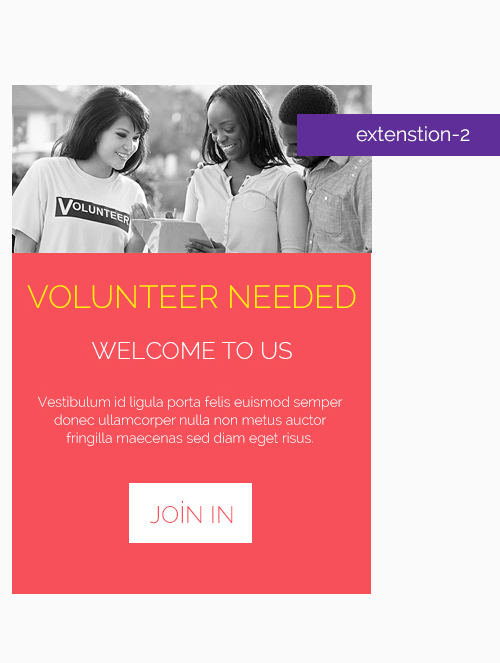
Title part comes with custom html module and published on position name extension-2. You have to add module class suffix volunteer from advance tab of this module.
Please, find the html code below
<p><img class="img-responsive" src="images/itl_demo/all/volunteer.jpg" alt="volunteer needed" /></p>
<h2>Volunteer Needed</h2>
<h3>Welcome to us</h3>
<p class="text">Vestibulum id ligula porta felis euismod semper donec ullamcorper nulla non metus auctor fringilla maecenas sed diam eget risus.</p>
<p><a class="btn btn-join" href="#">Join In</a></p>
Event Header

Title Part comes with custom html module and published on position name event-header. You have to add module class suffix mod-header center-align from advance tab of this module.
Event Timer

Title Part comes with Smart Countdown module and published on position name event-timer. You have to add module class suffix countdown from advance tab of this module.
You can also check the detail documentation of this module Here...
Team Header

Title Part comes with custom html module and published on position name team-header. You have to add module class suffix mod-header center-align from advance tab of this module.
Team
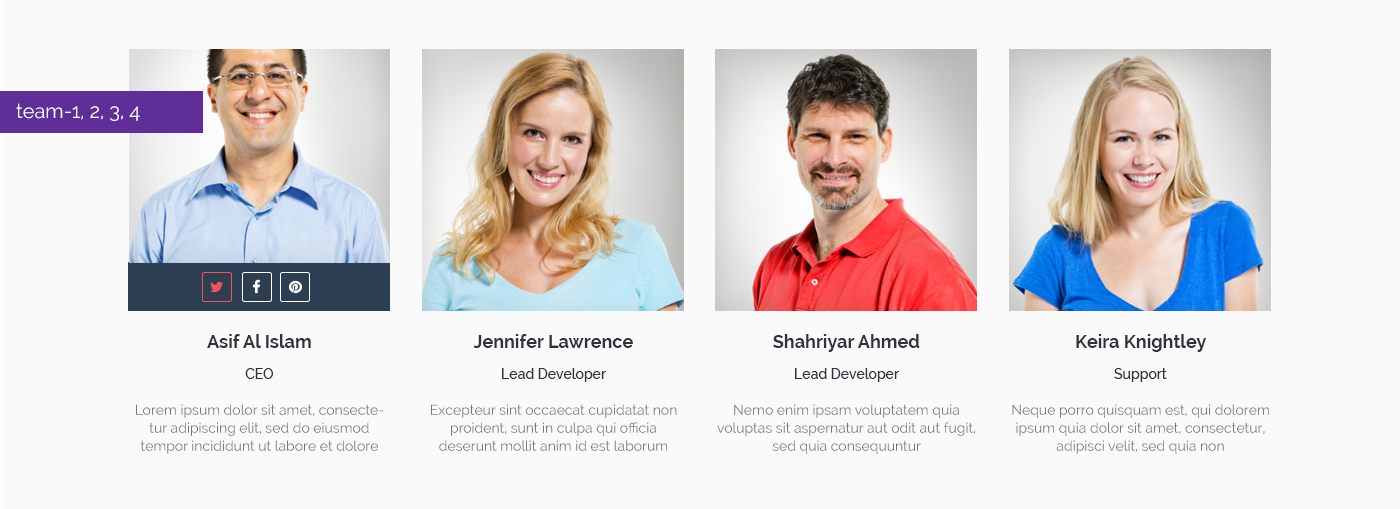
Title part comes with custom html module and published on position name team-1, team-2, team-3, team-4. You have to add module class suffix center-align from advance tab of this module.
Please, find the html code below
<div class="team-wrap">
<div class="team-img"><img class="img-responsive" src="images/itl_demo/team/avatar_1.jpg" alt="team-avatar" />
<div class="team-social">
<a href="#"><i class="fa fa-twitter"> </i></a> <a href="#"><i class="fa fa-facebook"> </i></a> <a href="#"><i class="fa fa-pinterest"> </i></a>
</div>
</div><!--/.team-img-->
<div class="team-content">
<h4>Asif Al Islam</h4>
<span class="designation">CEO</span>
<p>Temporibus autem quibusdam et aut officiis debitis aut rerum necessi tatibus saepe eveniet ut et voluptates</p>
</div><!--/.team-content-->
</div><!--/.team-wrap-->
Recent Blog Posts
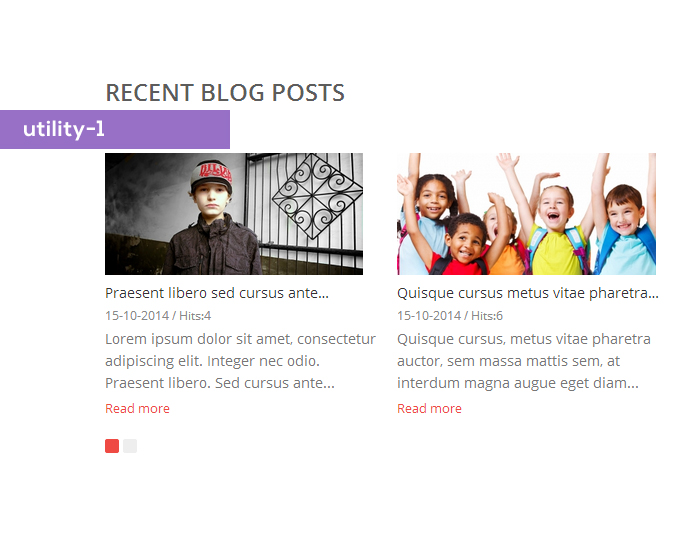
We used News Show Pro Gk5 to present Latest Blog Posts from K2 with module class suffix mod-header style-1. You can find the settings screenshot below:
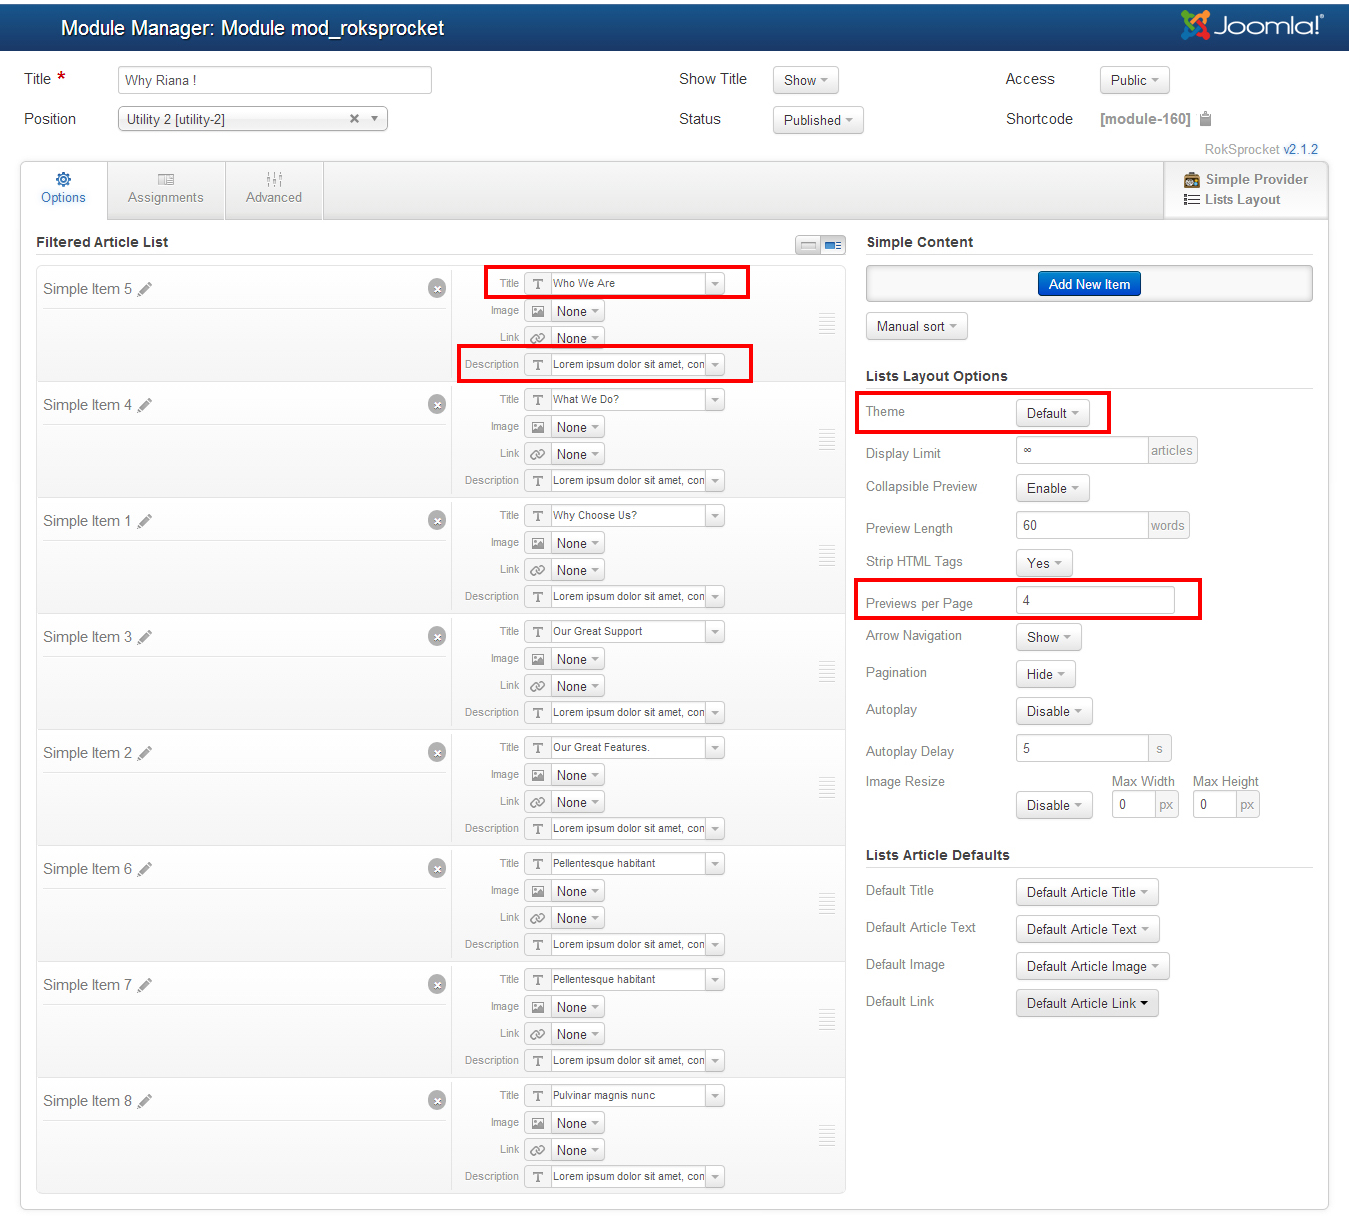
Why Riana!
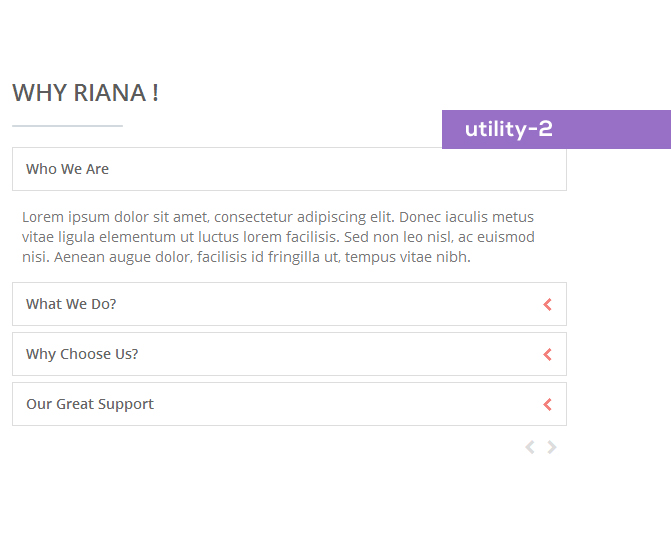
This parts comes by great Roksprocket module's List layout with Joomla article and module class suffix mod-header. At first create some article with category category name.
Another way to do this is directly put info and images into this module.
See the below configuration of Roksprocket module style List.
Fact
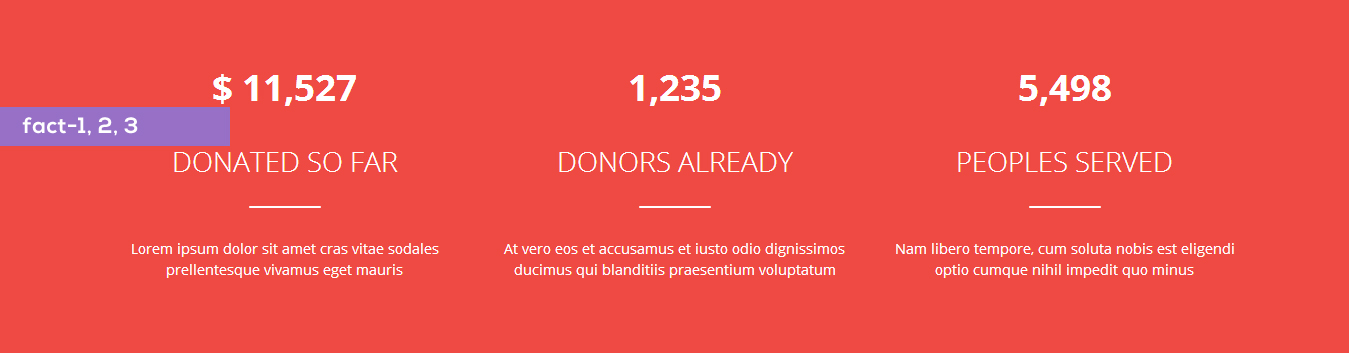
Title part comes with custom html module and published on position name fatc-1, fatc-2, fatc-3, fatc-4. You have to add module class suffix fact white center-align from advance tab of this module.
Please, find the html code below
<p><b class="fact-number">$ 11,527</b></p>
<h3>Donated So Far</h3>
<p>Lorem ipsum dolor sit amet cras vitae sodales prellentesque vivamus eget mauris</p>
Sponsores

This parts comes by great Roksprocket module's Strips layout with Joomla article. At first create some article with category category name. Put images on articl's intro image box from Images and links tab.
Another way to do this is directly put images into this module.
See the below configuration of Roksprocket module style List.
Footer-1
Title part comes with custom html module and published on position name footer-1 with module class suffix address from advance tab of this module.
Please, find the html code below
<ul>
<li class="footer-contact"><i class="fa fa-home"> </i>123, Second Street name, Address.</li>
<li class="footer-contact"><i class="fa fa-envelope"> </i><a href="#">ithemeslab@gmail.com </a></li>
<li class="footer-contact"><i class="fa fa-phone"> </i>+1 (123) 456-7890</li>
<li class="footer-contact"><i class="fa fa-globe"> </i><a href="http://ithemeslab.com">www.ithemeslab.com</a></li>
</ul>
Footer-2
Title part comes with custom html module and published on position name footer-2.
Please, find the html code below
<p><img class="footer-logo img-responsive" src="images/itl_demo/all/footer-logo.png" alt="Footer Logo" /></p>
<p>Pellentesque imperdiet purus quis metus imperdiet fermentum. Vestibulum quam elit dapubus</p>
Footer-3
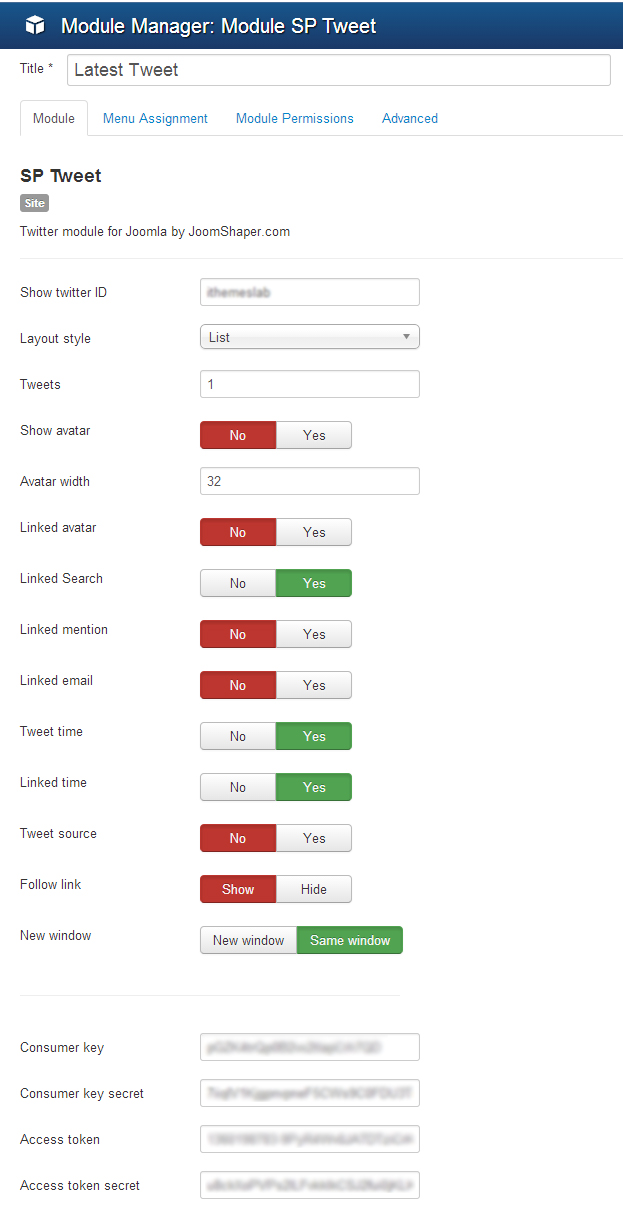
Title part comes with SpTweet module and published on position name footer-3.
Check the settings of this module below:
Footer-4
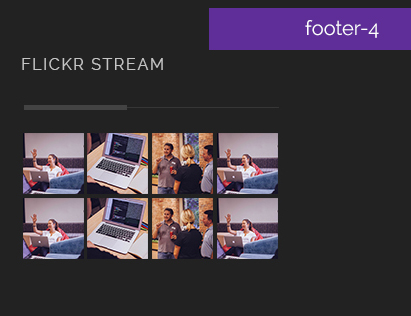
Title part comes with Art Sexy Lightbox and published on position name footer-4. We used the image dimension is 500px X 500px.
Check the settings of this module below:
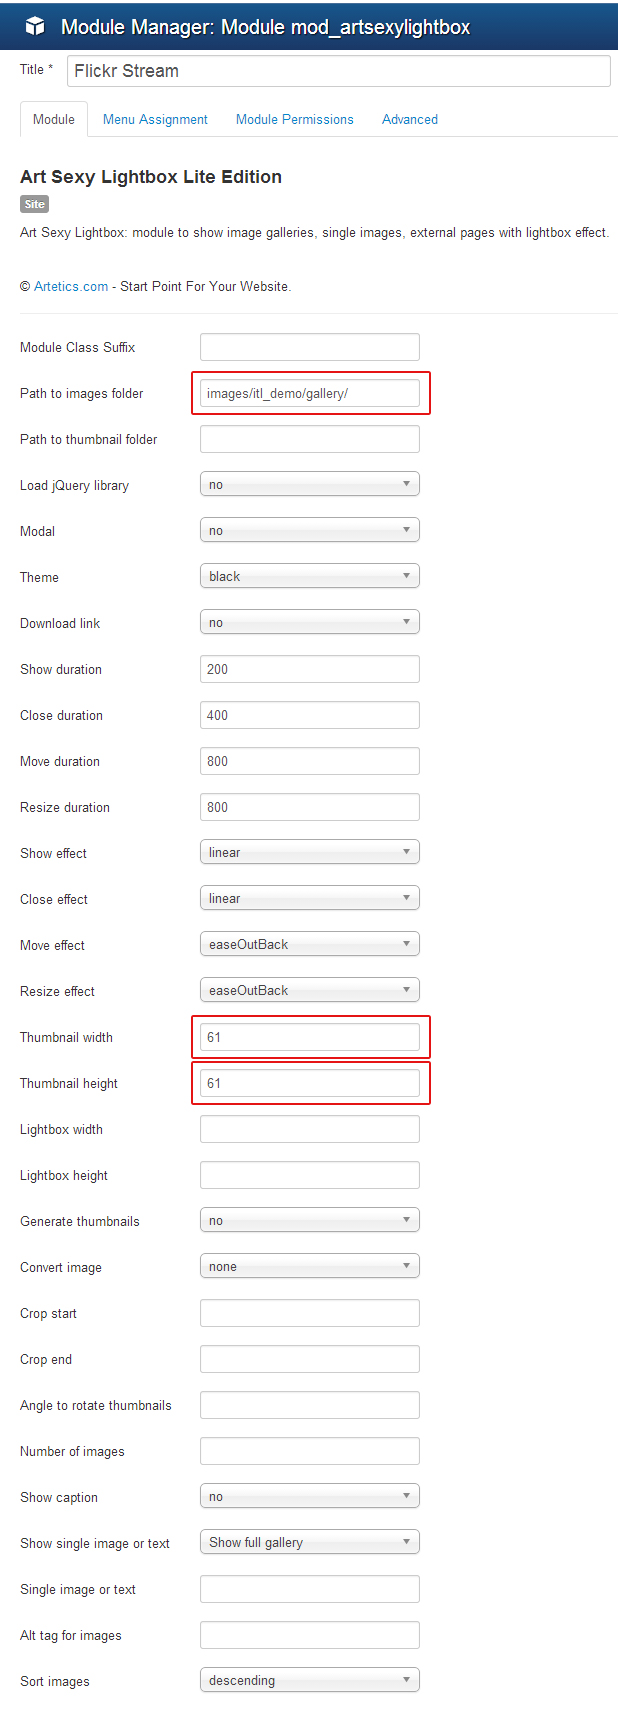
Photo Gallary
This part comes by shortcode. Just put this shortcode in an article and get your Gallery ready. Image dimension is 600px X 400px. Check the shortcode below:
{gallery}itl_demo/main-gallery{/gallery}Logo Customization
Log into your joomla administrator. Go to Extensions > Template Manager > itl_riana - Deafault. Click on Theme Tab and change your logo from Logo Image Uploader.
Color Preset
Log into your joomla administrator. Go to Extensions > Template Manager > itl_riana - Deafault. Click on Theme Tab and select your preset style from Theme's dropdown list.
Enable Debug Module Position
Go to Extensions > Template Manager > itl_riana - Deafault. Click on Custom Code Tab and turn on "Show Debug Module Position".
T3 Documenation with video link
Here is the documenation link of T3 Framework.
At a glance video of T3 framework
Thank You
Once again, thank you so much for purchasing this template. As I said at the beginning, I'd be glad to help you if you have any questions relating to this template. If you have a more general question relating to the template on ThemeForest, you might consider to mail at ithemeslab@gmail.com